Reference:
Microsoft PowerPoint - SImple NPS Configuration as Radius Part 1.ppt
Windows 2008 Server NPS網路原則與存取服務(Radius Server)研究與教學
Configuring Server 2008 for RADIUS Authentication - Matt Williamson's Blog
The Network Administrator » Windows Server 2008 as a RADIUS Server for a Cisco ASA 5000 Series
2011年11月30日 星期三
2011年11月29日 星期二
sshfs for linux
# apt-get install sshfs
$ sshfs -o idmap=user,uid=1000,gid=1000 username@123.456.78.9:/home/username ./mountpoint
$ fusermount -u ./mountpoint
# modprobe fuse
$ sshfs -o idmap=user,uid=1000,gid=1000 username@123.456.78.9:/home/username ./mountpoint
$ fusermount -u ./mountpoint
ubuntu radius server
# apt-get install freeradius freeradius-mysql freeradius-utils
# vi /etc/freeradius/users
205 testing Cleartext-Password := "12345"
# freeradius -X
// radtest username password server auth_port secret
$ radtest testing 12345 localhost 1812 testing123
Reference :
FreeRADIUS -- Documentation
Basic Configuration Howto
Howto: Freeradius on Ubuntu 9.04
# vi /etc/freeradius/users
205 testing Cleartext-Password := "12345"
# freeradius -X
// radtest username password server auth_port secret
$ radtest testing 12345 localhost 1812 testing123
Reference :
FreeRADIUS -- Documentation
Basic Configuration Howto
Howto: Freeradius on Ubuntu 9.04
2011年11月25日 星期五
vnc server on CentOS
# yum install vnc-server
# useradd -m user1
# passwd user1
# su - user1
$ vncpasswd // it will create ~/.vnc/passwd
# vi /etc/sysconfig/vncservers
# /etc/init.d/vncserver start
$ vi ~/.vnc/xstartup
客製化啟動 x
# /etc/init.d/vncserver restart
Reference :
HowTos/VNC-Server - CentOS Wiki
# useradd -m user1
# passwd user1
# su - user1
$ vncpasswd // it will create ~/.vnc/passwd
# vi /etc/sysconfig/vncservers
VNCSERVERS="1:user1 2:user2"
VNCSERVERARGS[1]="-geometry 800x600"
VNCSERVERARGS[2]="-geometry 640x480"
# /etc/init.d/vncserver start
$ vi ~/.vnc/xstartup
客製化啟動 x
# /etc/init.d/vncserver restart
Reference :
HowTos/VNC-Server - CentOS Wiki
2011年11月24日 星期四
SIOCSIFFLAGS: No such file or directory
iwl3945 0000:05:00.0: iwlwifi-3945-2.ucode firmware file req failed: -2
iwl3945 0000:05:00.0: iwlwifi-3945-1.ucode firmware file req failed: -2
$ wget http://intellinuxwireless.org/iwlwifi/downloads/iwlwifi-3945-ucode-2.14.4.tgz
# tar zxf iwlwifi-3945-ucode-2.14.4.tgz
# cp iwlwifi-3945-ucode-2.14.4/iwlwifi-3945.ucode /lib/firmware/
edit: the newer code needs the ucode to be numbered, its actually the same ucode, but just with a different file name, so if you get this error iwlwifi-3945-1.ucode firmware file req failed: Reason -2
then just run the following command.
# cp /lib/firmware/iwlwifi-3945.ucode /lib/firmware/iwlwifi-3945-1.ucode
iwl3945 0000:05:00.0: iwlwifi-3945-2.ucode firmware file req failed: -2
$ wget http://intellinuxwireless.org/iwlwifi/downloads/iwlwifi-3945-ucode-15.32.2.9.tgz
$ tar zxf iwlwifi-3945-ucode-15.32.2.9.tgz
# cp iwlwifi-3945-ucode-15.32.2.9/iwlwifi-3945-2.ucode /lib/firmware/
Reference :
Installing iwlwifi with a debian kernel - Foomagic
Intel® Wireless WiFi Link drivers for Linux*
2011年11月23日 星期三
ubuntu 8.04 安裝 openser
# vi /etc/default/openser
RUN_OPENSER=yes
# vi /etc/openser/openserctlrc
SIP_DOMAIN=192.168.0.254
DBENGINE=MYSQL
# /usr/sbin/openserdbctl create
INFO: creating DBTEXT tables at: /usr/local/etc/openser/dbtext ...
Install presence related tables? (y/n): y
INFO: creating DBTEXT presence tables at: /usr/local/etc/openser/dbtext ...
Install tables for imc cpl siptrace domainpolicy carrierroute? (y/n): y
INFO: creating DBTEXT extra tables at: /usr/local/etc/openser/dbtext ...
設定基本上參考這邊
OpenSER installation and configuration guide on Fedora
另外我又修改幾個地方
# vi /etc/openser/openser.cfg
modparam("usrloc", "db_url", "mysql://openser:openser@127.0.0.1/openser")
modparam("auth_db", "db_url", "mysql://openser:openser@127.0.0.1/openser")
modparam(“acc”, “radius_config”, ””)
// openserctl add USERNAME PASSWORD EMAIL
$ openserctl add 101 101 101@10.0.0.254
MySQL password for user 'openser@localhost': [openserrw]
new user '101' added
$ openserctl db show subscriber
# /etc/init.d/openser restart
要是無法啟動再開啟 debug
# vi /etc/openser/openser.cfg
log_stderror=yes
[~]@rose yan: openserctl add 617 617 cam0617@gmail.com
Reference :
Building Telephony Systems with OpenSIPS 1.6
FreeRuner Zhone Preference
/etc/freesmartphone/opreferences/
├── conf
│ ├── phone
│ │ ├── default.yaml -> /etc/alternatives/fso-frameworkd-default-sounds.yaml
│ │ ├── silent.yaml
│ │ └── vibrate.yaml
│ ├── profiles
│ │ └── default.yaml
│ └── rules
│ ├── default.yaml
│ └── silent.yaml
└── schema
├── phone.yaml
├── profiles.yaml
└── rules.yaml
├── conf
│ ├── phone
│ │ ├── default.yaml -> /etc/alternatives/fso-frameworkd-default-sounds.yaml
│ │ ├── silent.yaml
│ │ └── vibrate.yaml
│ ├── profiles
│ │ └── default.yaml
│ └── rules
│ ├── default.yaml
│ └── silent.yaml
└── schema
├── phone.yaml
├── profiles.yaml
└── rules.yaml
2011年11月22日 星期二
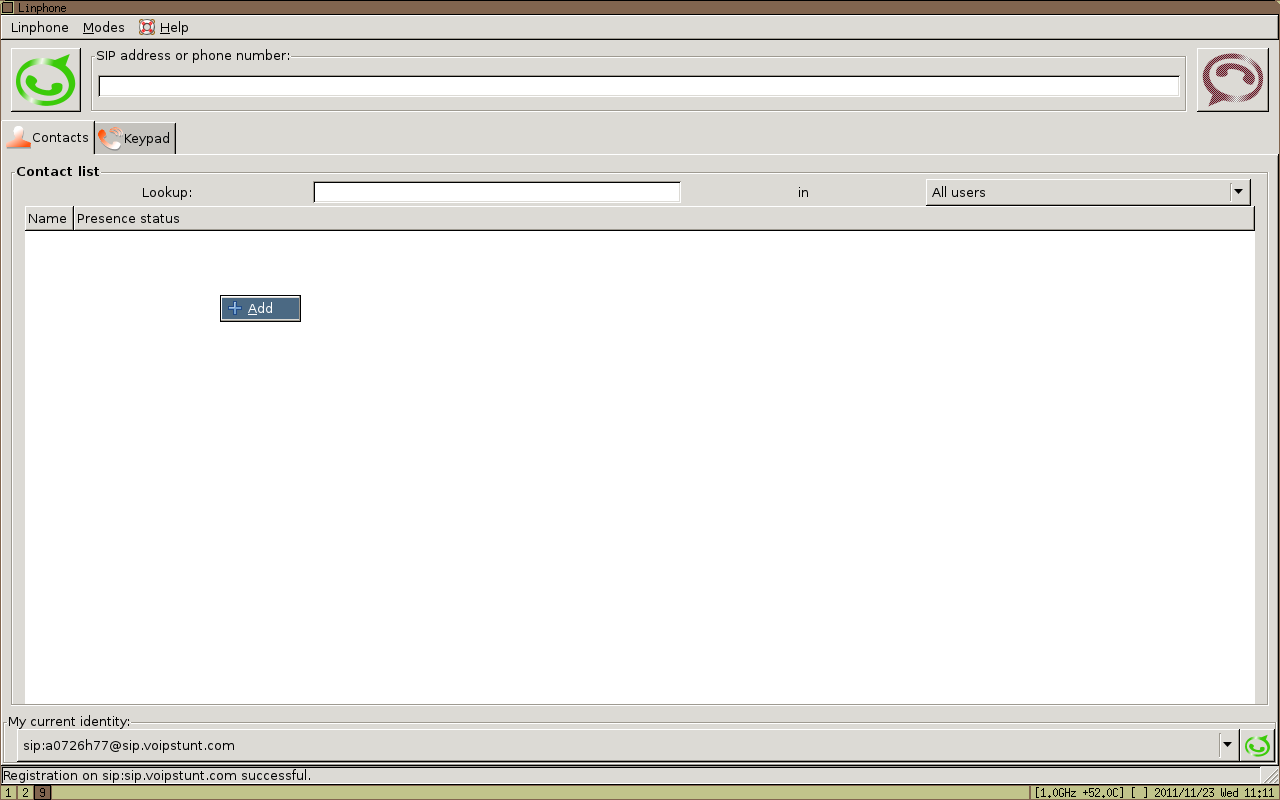
使用 Linphone 連上 VOIPSTUNT


2011年11月19日 星期六
SQL Server 資料庫備份、轉移
使用 Microsoft SQL Server Management Studio
Reference :
Microsoft SQL Server 備份還原與轉換
SQL Server 2008(R2) 資料庫移轉至SQL Server 2005
SQL Server 2005資料庫資料表轉移至另一個2005 server?
- 在原來的資料表按右鍵→編寫資料表的指令碼→Create Table至→剪貼簿(這樣的方式才會把一些擴充屬性加到新的資料表)
- 在目的地的資料庫上新增查詢→貼上指令碼→執行
- 在原來的資料表中右鍵→工作→匯出資料
- 透過精靈一步步的選擇,執行
Reference :
Microsoft SQL Server 備份還原與轉換
SQL Server 2008(R2) 資料庫移轉至SQL Server 2005
SQL Server 2005資料庫資料表轉移至另一個2005 server?
2011年11月18日 星期五
ATA-171M 設定
若是 ATA 設定修改完, 需要 Save Change than Reboot
http://192.168.123.1:9999/
"root" / ""
連接到 SIP Server 那端接 WAN
市話話機接 Phone
話機撥
#126# => WAN IP
#120# => LAN IP
#195# => Reboot
設定 SIP Server
SIP -> Service Domain

可以申請 sip2sip 網內戶撥或號碼代接
帳號都用註冊時的帳號
密碼用註冊的密碼
Domain : sip2sip.info
Proxy : sip2sip.info
Outbound : proxy.sipthor.net
一組可以註冊 voipstunt 免費打台灣市話

05-2232222
要撥打
0088652232222
或
+88652232222
一些asterisk 使用經驗分享 及擴充計劃 - 這是jammytaiwan的部落格 - Yahoo!奇摩部落格
VoipStunt --- 打電話、手機到全球二十幾個國家都不用錢....包括台灣 @ . :: 痞客邦 PIXNET ::"
設定話機撥號規則 (選擇撥出線路)
Phone Setting -> Dial Plan
預設的話話機撥 0* 為走 PSTN
1* 為 Realm 1
2* 為 Realm 2
依此類推...
電話簿
Phone Book -> Phone Book
Position 只是為登記在第幾筆
Name 為隨意但不重複之數字 ex: 101
Number or URL 可以設定市話號碼或是 SIP URL ex: xxx@sip2sip.info
這樣拿起話筒按下 101# 即可撥給 xxx@sip2sip.info
快速撥號似乎要有功能鍵的話機才能使用
來電轉接
Phone Setting -> Call Forward
可以設定以下三種狀態
All Forward 為所有來電都轉接
Busy Forward 為該線忙線時轉接
No Anwser Forward 為無人接聽時轉接
另外需要設定響鈴延遲次數
DND 為勿打擾功能, 設定一個時間拒絕打擾
free sip server / proxy / trunk
Reference :
The Free SIP Account Provider List : Free SIP Accounts To Connect Your Mobile VoIP Or At Home VoIP Phones. | VOIP IP Telephony
http://www.voipstunt.com/
http://www.voipbuster.com/
http://www.voipbusterpro.com/
http://www.freecall.com/
The Free SIP Account Provider List : Free SIP Accounts To Connect Your Mobile VoIP Or At Home VoIP Phones. | VOIP IP Telephony
http://www.voipstunt.com/
http://www.voipbuster.com/
http://www.voipbusterpro.com/
http://www.freecall.com/
Asterisk 架設 SIP Server
Reference :
唉呦~MIS先生: 免費的SIP Server:Asterisk
Asterisk HOME IP PBX架設經驗分享談 - Jieen_Ro的专栏 - 博客频道 - CSDN.NET
Asterisk – SIP Trunk 設定 | 宅男居
各家 Provider 的 SIP Trunk 設定 @ 安德森技術備忘板 :: 痞客邦 PIXNET ::
Getting Started With Asterisk
安裝應用擴展的基本職能的Asterisk « 電話 « 免費的網絡電話的基礎上星號西爾萬塞里恩
自建專業級 PBX:trixbox
使用voipstunt免費打台灣室內電話 & 1分鐘手機 - Charlie's Blog - Yahoo!奇摩部落格
ffmpeg 轉檔
AVI to FLV
$ ffmpeg -i xxx.AVI -ar 22050 -ab 32 -f flv -s 320x256 xxx.flv
AVI to MP4
$ ffmpeg -i xxx.AVI -b 300 -s 320x240 -vcodec xvid -ab 32 -ar 24000 -acodec aac xxx.mp4
AVI to PAL-VCD
$ ffmpeg -i xxx.AVI -target pal-vcd xxx.MPEG
AVI to NTSC-VCD
$ ffmpeg -i xxx.AVI -target ntsc-vcd xxx.MPEG
$ ffmpeg -i xxx.AVI -ar 22050 -ab 32 -f flv -s 320x256 xxx.flv
AVI to MP4
$ ffmpeg -i xxx.AVI -b 300 -s 320x240 -vcodec xvid -ab 32 -ar 24000 -acodec aac xxx.mp4
AVI to PAL-VCD
$ ffmpeg -i xxx.AVI -target pal-vcd xxx.MPEG
AVI to NTSC-VCD
$ ffmpeg -i xxx.AVI -target ntsc-vcd xxx.MPEG
2011年11月17日 星期四
sshd 允許 root 登入
# vi /etc/ssh/sshd_config
==========================
PermitRootLogin yes
==========================
# /etc/init.d/ssh restart
==========================
PermitRootLogin yes
==========================
# /etc/init.d/ssh restart
Facebook Chat with pidgin & finch

* 不必安裝 pidgin-facebookchat 外掛
* 帳號為 Facebook 個人網址的用戶名稱
Reference :
http://www.insidefacebook.com/2010/02/12/how-to-use-facebook-chat-with-pidgin/
2011年11月16日 星期三
Linux 金融卡讀卡機 轉帳
Env:
# apt-get install libccid libpcsclite1 libpcsc-perl pcsc-tools
# apt-get install libusb-dev
// 自行編譯 pcscd
$ wget https://alioth.debian.org/frs/download.php/3598/pcsc-lite-1.7.4.tar.bz2
$ tar jxvfpcsc-lite-1.7.4.tar.bz2
$ cd pcsc-lite-1.7.4
$ ./configure --prefix=/home/yan/pcsc-lite-1.7.4 --enable-usbdropdir=/usr/lib/pcsc/drivers/ --enable-libusb --disable-libudev
$ make
# make install
// 安裝 Ez100PU driver
從這裡下載 => http://www.casauto.com.tw/in-download-02.aspx?wcid=C_00000017&id=P_00000009&cid=C_00000001
$ cd EZUSB_Linux/EZUSB_Linux_x86_v1.5.3/driver_ezusb_v1.5.3
# sh install
// 執行 pcscd && 測試一下
# ./pcscd -df
$./testpcsc
// 安裝玉山銀行瀏覽器連結讀卡機之 plugin (for firefox)
http://netbank.esunbank.com.tw/webatm/cabs/esb_xcsp_for_firefox-1.0.4.5-fx-Linux_x86-gcc3.xpi
或這裡 6.安裝玉山銀行Linux專用版 WebATM plugin(32-bit)
玉山銀行
第一銀行 元件下載
郵局
Reference :
Linux 晶片卡讀卡機 使用心得
第一次在 linux 用金融卡轉帳
智慧晶片讀卡機 EZ100PU | YORKXIN×YORKXIN
Gentoo Linux 安裝使用玉山銀行 WebATM
軟體工匠 R 的筆記: 2011/10
Thank you E.Sun Bank.I can use WebATM on Linux! - Pedaling Upwards
Alioth: Muscle PCSC lite: Project Filelist
bmark -title=元件安裝說明 https://webatm.post.gov.tw/postatm/help/ActiveX.htm
Debian GNU/Linux wheezy/sid \n \l
libccid 1.4.5-1 PC/SC driver for USB CCID smart card readers
ii libpcsc-perl 1.4.12-1+b1 Perl interface to the PC/SC smart card library
ii libpcsclite1 1.7.4-2 Middleware to access a smart card using PC/SC (library)
ii pcsc-tools 1.4.17-1 Some tools to use with smart cards and PC/SC
# apt-get install libccid libpcsclite1 libpcsc-perl pcsc-tools
# apt-get install libusb-dev
// 自行編譯 pcscd
$ wget https://alioth.debian.org/frs/download.php/3598/pcsc-lite-1.7.4.tar.bz2
$ tar jxvfpcsc-lite-1.7.4.tar.bz2
$ cd pcsc-lite-1.7.4
$ ./configure --prefix=/home/yan/pcsc-lite-1.7.4 --enable-usbdropdir=/usr/lib/pcsc/drivers/ --enable-libusb --disable-libudev
$ make
# make install
// 安裝 Ez100PU driver
從這裡下載 => http://www.casauto.com.tw/in-download-02.aspx?wcid=C_00000017&id=P_00000009&cid=C_00000001
$ cd EZUSB_Linux/EZUSB_Linux_x86_v1.5.3/driver_ezusb_v1.5.3
# sh install
// 執行 pcscd && 測試一下
# ./pcscd -df
$./testpcsc
// 安裝玉山銀行瀏覽器連結讀卡機之 plugin (for firefox)
http://netbank.esunbank.com.tw/webatm/cabs/esb_xcsp_for_firefox-1.0.4.5-fx-Linux_x86-gcc3.xpi
或這裡 6.安裝玉山銀行Linux專用版 WebATM plugin(32-bit)
玉山銀行
第一銀行 元件下載
Reference :
Linux 晶片卡讀卡機 使用心得
第一次在 linux 用金融卡轉帳
智慧晶片讀卡機 EZ100PU | YORKXIN×YORKXIN
Gentoo Linux 安裝使用玉山銀行 WebATM
軟體工匠 R 的筆記: 2011/10
Thank you E.Sun Bank.I can use WebATM on Linux! - Pedaling Upwards
Alioth: Muscle PCSC lite: Project Filelist
bmark -title=元件安裝說明 https://webatm.post.gov.tw/postatm/help/ActiveX.htm
Accessing SQL Server Databases with PHP
Reference :
Accessing SQL Server Databases with PHP
PHP 與 MS SQL 使用 UTF-8 溝通的解決方式 | :: corAusir :: 程式逗設計
* PHP 連結 MSSQL Server 只需要透過 SQL Server Driver, 而 ASP 要連結 MySQL 則要透過 ODBC
Accessing SQL Server Databases with PHP
PHP 與 MS SQL 使用 UTF-8 溝通的解決方式 | :: corAusir :: 程式逗設計
* PHP 連結 MSSQL Server 只需要透過 SQL Server Driver, 而 ASP 要連結 MySQL 則要透過 ODBC
cacti monitor plugin
要在 cacti 使用 plugin 要先將 cacti patch 有 plugin management
Installing the Plugin Architecture (PIA)
1. 修改 config
2. patch
3. 新增至資料庫
4. 安裝 monitor plugin
Install Monitor Plugins for CACTI
Installing the Plugin Architecture (PIA)
1. 修改 config
2. patch
3. 新增至資料庫
4. 安裝 monitor plugin
Install Monitor Plugins for CACTI
2011年11月14日 星期一
2011年11月12日 星期六
監控 CPU 溫度與調整頻率
監控溫度
# apt-get install lm-sensors
# sensors-detect
都選YES
# reboot
# sensors
調整 CPU 頻率
* Intel i3, i5, i7 CPU need disable intel_pstate from boot
// 取得可用頻率
# cat /sys/devices/system/cpu/cpu0/cpufreq/scaling_available_frequencies
or
# cpufreq-info | grep 'available frequency'
==========================================
# apt-get install lm-sensors
# sensors-detect
都選YES
# reboot
# sensors
調整 CPU 頻率
# lsmod | grep "acpi_cpufreq"* Intel i3, i5, i7 CPU need disable intel_pstate from boot
intel_pstate=disable
// 取得可用頻率
# cat /sys/devices/system/cpu/cpu0/cpufreq/scaling_available_frequencies
or
# cpufreq-info | grep 'available frequency'
==========================================
#!/bin/sh

for i in `cat /proc/cpuinfo | grep processor | awk '{print $3}'`;
do
    cpufreq-set -c $i -f `cat /sys/devices/system/cpu/cpu0/cpufreq/cpuinfo_min_freq`
done
==========================================
References :HowTo/CpuFrequencyScaling - Debian Wiki2011年11月10日 星期四
/usr/bin/xdg-open: 461: /usr/bin/xdg-open: x-www-browser: not found
# ln -s /bin/firefox /usr/bin/x-www-browser
2011年11月5日 星期六
設定 mysql root 密碼
$ mysql -u root -p
mysql> use mysql;
mysql> UPDATE user SET password=PASSWORD('MYPASS') WHERE user='root';
mysql> FLUSH PRIVILEGES;
另外,恢復 mysql root 密碼
//將原本 mysqld 關閉, 將 mysql 啟動於
# /etc/init.d/mysql stop
# mysqld -u root --skip-grant-tables &
// 進入 mysql
# mysql
mysql> use mysql;
mysql> UPDATE user SET password=password('new password') where user='root';
mysql> FLUSH PRIVILEGES;
// 重新啟動 mysql
# pkill mysql
# /etc/init.d/mysql start
mysql> use mysql;
mysql> UPDATE user SET password=PASSWORD('MYPASS') WHERE user='root';
mysql> FLUSH PRIVILEGES;
另外,恢復 mysql root 密碼
//將原本 mysqld 關閉, 將 mysql 啟動於
# /etc/init.d/mysql stop
# mysqld -u root --skip-grant-tables &
// 進入 mysql
# mysql
mysql> use mysql;
mysql> UPDATE user SET password=password('new password') where user='root';
mysql> FLUSH PRIVILEGES;
// 重新啟動 mysql
# pkill mysql
# /etc/init.d/mysql start
分析 debian-installer 啟動流程
/init (initramfs)
↓ (多數系統在此轉換入實體作業系統磁區)
/bin/busybox init (initramfs)
↓
/etc/inittab (initramfs)
↓
/sbin/debian-installer-startup
* kernel 2.6 以上為 initramfs, 舊的是 initrd
Reference :
BootProcess - Debian Wiki
Jserv's blog: 深入理解 Linux 2.6 的 initramfs 機制 (上)
↓ (多數系統在此轉換入實體作業系統磁區)
/bin/busybox init (initramfs)
↓
/etc/inittab (initramfs)
↓
/sbin/debian-installer-startup
* kernel 2.6 以上為 initramfs, 舊的是 initrd
Reference :
BootProcess - Debian Wiki
Jserv's blog: 深入理解 Linux 2.6 的 initramfs 機制 (上)
mdadm 系統碟
開機 grub 參數 root 要指向新建的 raid => root=/dev/md1
若開機出現 No RAID Didks, 則需要更新 initrd 以利偵測 raid 磁碟
備份、重建
# cd /boot
# mv initrd-`uname -r` initrd-`uname -r`.orig
# mkinitramfs -o initrd-`uname -r` `uname -r`
或 直接更新
# update-initramfs -k `uname -r` -c -t
Reference :
SSORC.tw » Blog Archive » 系統安裝 raid1 + mdadm (未完)
UBUNTU 10.10 在現有系統下卦載 RAID1 採用 mdadm
不重灌系統下實作 RAID1 for Fedora 8 Linux @ 安德森技術備忘板 :: 痞客邦 PIXNET ::
mike liu - Google+ - ubuntu 遷移到 raid 0 的問題. - richliu's blog
2011年11月4日 星期五
first program on arduino uno
1. Install the development enviromnet on Debian
Refer to -> Arduino playground - Debian
2. Connect Arduino Uno to PC and start the IDE
# arduino
3. LED blinking sample


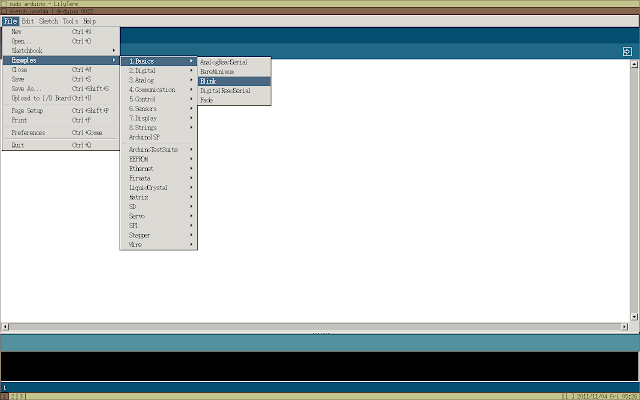 Let the built-in LED blink.
The built-in LED connected to digital pin 13.


Reference :
Arduino Tutorial - Lesson 1 - Let there be blink!
Arduino - ArduinoBoardUno
Refer to -> Arduino playground - Debian
2. Connect Arduino Uno to PC and start the IDE
# arduino
3. LED blinking sample
- Select chip

- Select port

- Open sample code
 Let the built-in LED blink.
The built-in LED connected to digital pin 13.
- Compile

- Upload

Reference :
Arduino Tutorial - Lesson 1 - Let there be blink!
Arduino - ArduinoBoardUno
2011年11月3日 星期四
ext2 / ext3 恢復刪除檔案
# ext3grep /dev/sda1 –restore-file /etc/passwd
* 目前 ext3grep 只能單檔恢復 ( --restore-file xxx ) 或整個分區恢復 ( --restore-all )
Reference :
ext3grep - A tool to investigate an ext3 file system for deleted content and possibly recover it. - Google Project Hosting
使用ext3grep恢复ext3上删除的文件 - Linux文档专区 - ChinaUnix.net
使用ext3grep恢复ext3上删除的文件 - linuxの飘扬 - Power by www.linuxfly.org
HOWTO undelete removed files and directories on an ext3 file system
ext2文件系统下恢复误删除的文件--北京北亚数据恢复中心_4006-505-808
2011年11月2日 星期三
qemu guest 上網
Host :
# apt-get install uml-utilities
# modprobe tun
# apt-get install uml-utilities
# modprobe tun
# ls /dev/net/tun // 會在 /dev/net 生成 tun 節點
# qemu -kernel vmlinuz -initrd initrd.img-2.6.32-5-486 -net nic -net tap &
# ifconfig -a // 啟動 qemu 後可以看到新增的網路裝置, 並有 IP (qemu 執行了 /etc/qemu-ifup)
# echo "1" > /proc/sys/net/ipv4/ip_forward
# iptables -t nat -A POSTROUTING -o eth0 -s 172.20.0.1/24 -j MASQUERADE
# echo "1" > /proc/sys/net/ipv4/ip_forward
# iptables -t nat -A POSTROUTING -o eth0 -s 172.20.0.1/24 -j MASQUERADE
Guest :
# ifconfig eth0 172.20.0.2
# route add default gw 172.20.0.1
# ping 8.8.8.8 -w 4
Reference :
qemu两种上网方式 - qemu - 虚拟机之家
ubuntu 9.10 qemu安装tinylinux 上网设置 | Tek-life
qemu网络设置 ubuntu - Blog of HunterChen - 博客频道 - CSDN.NET
Manual page man(1) line ?/? (END)
應該是 troff 解析文件的 macro 錯誤了
# apt-get install groff-base --reinstall
# apt-get install groff-base --reinstall
2011年11月1日 星期二
Linux create iso image
1.
$ dd if=/dev/cdrom of=~/cdrom_image.iso
2.
$ mkisofs -o /tmp/cd.iso /tmp/directory/
3.
$ genisoimage -b isolinux.bin -no-emul-boot -boot-load-size 4 -boot-info-table -o test.iso -J debian/
$ dd if=/dev/cdrom of=~/cdrom_image.iso
2.
$ mkisofs -o /tmp/cd.iso /tmp/directory/
3.
$ genisoimage -b isolinux.bin -no-emul-boot -boot-load-size 4 -boot-info-table -o test.iso -J debian/
在電腦玩打卡
用 Firefox + Geolocater (透過瀏覽器送出的有線網路IP地理位置有誤差)
http://touch.facebook.com/
另外可以輕量瀏覽 facebook
http://m.facebook.com/
http://touch.facebook.com/
另外可以輕量瀏覽 facebook
http://m.facebook.com/
linux arp spoofing
# ettercap -T -M arp:remote /192.168.219.1/ /192.168.219.17,26,35/
Reference : Ettercap, what can be done after ARP poisoning? » Linux by Examples修改 initrd
手動
=========================================
#!/bin/sh
## build initramfs
rm -r initrd initrd.img-2.6.32-5-486.new
mkdir initrd
cp initrd.img-2.6.32-5-486.orig initrd/
cd initrd/
# ========= in ./initrd/ ========
gzip -dc initrd.img-2.6.32-5-486.orig | cpio -id
# add files
cp -r ../myfile/* ./
find ./ | cpio -H newc -o > new-initrd.cpio
gzip new-initrd.cpio
cp new-initrd.cpio.gz ../initrd.img-2.6.32-5-486.new
# ========= in ./initrd/ ========
=========================================
=========================================
myfile/
|-- bin
| |-- ncftp
| |-- ncftpbatch
| |-- ncftpbookmarks
| |-- ncftpget
| |-- ncftpls
| |-- ncftpput
| `-- ncftpspooler
|-- dhcp.sh
|-- etc
| `-- udhcpc
| |-- default.bound
| |-- default.bound.orig
| |-- default.deconfig
| |-- default.leasefail
| |-- default.nak
| |-- default.renew
| `-- default.script
|-- init
`-- sbin
`-- udhcpc
=========================================
自動
Linux 2.6 INITRAMFS 自訂筆記
includes.chroot/usr/share/initramfs-tools/hooks/
copy_exec 函式
Reference :
Modifying initrd image - OpenVZ Linux Containers Wiki
我也來寫initrd @ 心的距離 :: 痞客邦 PIXNET ::
Jserv's blog: 深入理解 Linux 2.6 的 initramfs 機制 (上)
Richman 的雜記: initramfs 簡介,一個新的 initial RAM disks 的模型
通过ArchLinux制作一个可启动initramfs 1
通过ArchLinux制作一个可启动initramfs 2
有没有关于dracut 的资料............. - LinuxSir.Org
NcFTP, ncftpget, ncftput, command, Tech, Upload, Download, rsync [aT] [L]o[S]t – [H]ea[R]T
Download DHCP 3.1-ESV-R3 dhcp-3.1-ESV-R3.tar.gz | Internet Systems Consortium
=========================================
#!/bin/sh
## build initramfs
rm -r initrd initrd.img-2.6.32-5-486.new
mkdir initrd
cp initrd.img-2.6.32-5-486.orig initrd/
cd initrd/
# ========= in ./initrd/ ========
gzip -dc initrd.img-2.6.32-5-486.orig | cpio -id
# add files
cp -r ../myfile/* ./
find ./ | cpio -H newc -o > new-initrd.cpio
gzip new-initrd.cpio
cp new-initrd.cpio.gz ../initrd.img-2.6.32-5-486.new
# ========= in ./initrd/ ========
=========================================
=========================================
myfile/
|-- bin
| |-- ncftp
| |-- ncftpbatch
| |-- ncftpbookmarks
| |-- ncftpget
| |-- ncftpls
| |-- ncftpput
| `-- ncftpspooler
|-- dhcp.sh
|-- etc
| `-- udhcpc
| |-- default.bound
| |-- default.bound.orig
| |-- default.deconfig
| |-- default.leasefail
| |-- default.nak
| |-- default.renew
| `-- default.script
|-- init
`-- sbin
`-- udhcpc
=========================================
自動
Linux 2.6 INITRAMFS 自訂筆記
includes.chroot/usr/share/initramfs-tools/hooks/
copy_exec 函式
Reference :
Modifying initrd image - OpenVZ Linux Containers Wiki
我也來寫initrd @ 心的距離 :: 痞客邦 PIXNET ::
Jserv's blog: 深入理解 Linux 2.6 的 initramfs 機制 (上)
Richman 的雜記: initramfs 簡介,一個新的 initial RAM disks 的模型
通过ArchLinux制作一个可启动initramfs 1
通过ArchLinux制作一个可启动initramfs 2
有没有关于dracut 的资料............. - LinuxSir.Org
NcFTP, ncftpget, ncftput, command, Tech, Upload, Download, rsync [aT] [L]o[S]t – [H]ea[R]T
Download DHCP 3.1-ESV-R3 dhcp-3.1-ESV-R3.tar.gz | Internet Systems Consortium
MySQL 數據恢復
若 /etc/mysql/my.cnf 有設定 log_bin, 則可以透過 mysqlbinlog 分析歷史紀錄來復原
如果你用的myisam的存储引擎,如果你用的是delete from tbl;则MyISAM会直接将MYD文件长度清空。这时,你的数据还在磁盘上(文件中第一簇坏掉了,会丢一点数据)!这种情况下,找专门的数据恢复人员 (如果你非常熟悉操作系统的磁盘格式,当然你也可以自已一个扇区一个扇区把数据拿出来拼接)
如果你用的innodb, 则数据还不会被马上从文件中删除,这时备份下你的ibdata*,ib_logfile*,然后找innodb的开发人员帮你从文件中找出这些数据。(如果你愿意仔细研究一下innodb的数据格式的话,也是可以的,你的数据会在数据文件和日志文件中都有,关键是要有人懂它的文件数据格式)
DELETE实际上是把ROW的5byte头信息中的IS_DELETE位置为1,并不是真的删除,还可以通过程序直接读取ibd文件读出来,InnoDB格式可以参考姜承尧的书。MyISAM格式可以参考Steven_1981的博客。
但是truncate是真的把数据文件重建为初始状态,那没辙了。
Reference :
使用mysqlbinlog恢复数据 - 其他数据库开发 / MySQL/Postgresql
【求救】误删MySql数据库中一个表中的表数据,如何恢复? - 其他数据库开发 / MySQL/Postgresql
江湖救急,恢复单张表误删的数据! - MySQL数据库开发 - 开发者社区
mysql (MyIsAm表) delete 误删了数据如何恢复 - dandan&guangguang的日志 - 网易博客
MYSQL数据库误删除恢复笔记 - 程序互联 - 36战商会 商业,心理,智慧,互联网|身心灵,财富,成长,家园|积极,热情,洋溢滴,欢迎您回家 - Powered by Discuz!
Steven_1981的博客
udhcpc
udhcpc 為為嵌入式系統而做的 dhcp client
# udhcpc -i eth0 -s /etc/udhcpc/default.bound -T 10
Reference :
Gentoo Linux 文件 -- 網路模組
# udhcpc -i eth0 -s /etc/udhcpc/default.bound -T 10
Reference :
Gentoo Linux 文件 -- 網路模組
解開 deb 包
# dpkg --unpack xxx.deb
或
# ar -x xxx.deb
會生成兩個檔案, 解開 data.tar.gz 可得到軟體套件包檔案內容
$ tar zxf data.tar.gz
Reference :
如何解開 *.deb 的包裝檔 | 魔貝特
或
# ar -x xxx.deb
會生成兩個檔案, 解開 data.tar.gz 可得到軟體套件包檔案內容
$ tar zxf data.tar.gz
Reference :
如何解開 *.deb 的包裝檔 | 魔貝特
訂閱:
文章 (Atom)